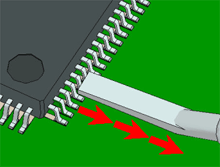
What is a solder bridge?
A solder bridge is formed on a circuit board when two points that are not meant to be linked ends up joined by excess solder, forming a "bridge". A solder bridge, while small, could end up causing a lot of problems for your electronics if unnoticed, such as leading to short circuits or causing your components to fry.
Why does bridging occur?
Solder bridges could be caused by the following:
- Soldering feed amount is too large.
- Iron movement speed is too fast.
- The tip is oxidized.
In addition, lead-free solder tends to cause bridging due to its characteristic of clinginess*. After ensuring that your solder amount is sufficient and the tip is clean, drag the tip slowly as if absorbing the solder of the bridged-section.
*"Non-clinginess" is when solder cuts easily and come off the work. Lead-free solder tends to cling and causes some problems such as bridging due to its high viscosity.
How is bridging prevented?
Prevent bridging by using specific tip shapes:
- In case of drag soldering, Shape BCM/CM having the hollow with its surface is recommended.
- In case of soldering at narrow pitches, the soldering tips with fine tip end are recommended. Click to read more on soldering at narrow pitches.
 |
1. Clean solder left in the hollow section with a cleaning sponge, etc. A small amount of solder may be left in the hollow section. 2. Put the tip on the bridge section and drag it. |
 |
If the bridge amount is small Stand the tip on end and drag the tip slowly. |
 |
If the bridge amount is large Lay down the end pad section and drag the tip slowly while putting the tip on the solder in the bridged section. |
 |
If the bridge amount is small Stand the blade on edge and drag the tip slowly. * Do not stand the blade up at too steep angle. Doing so will damage the P.W.B. |
 |
If the bridge amount is large Lay the blade down and drag the tip slowly |
 |
If the bridge amount is small Lay down the pad section and drag the tip slowly. |
 |
If the bridge amount is large Lay down the pad section and drag the tip slowly |